
Builders' Forum |
|
| ↓ Scroll to Last Comment ↓ | Forum Guidelines | Builders' Forum | |
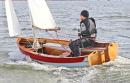
Just ordered plans for a micro bootlegger. My wife needs a classy ride. Going to be a good winter. This will be my second build. See ya on the water, in the spring.
8 replies:
RE: micro bootlegger
I am in the middle of building mine. Deck done. Hull halfway. So far so good. It is pretty straight forward. I think for me the most important item would be making sure the strips were milled good. I used some reclaimed wood so it took a lot of time to ready the strips. I am building mine without staples. Which by the way isn't as hard as it may seem. I can only work a couple of hours at a time so I can get a bit done, and walk away while it all sets up. Remember Its not really a race to finish. Try not to put pressure on yourself about some finish date. The more time you take in the details now will payoff in the end. Don't forget to take a lot of pictures.
cajunred
RE: micro bootlegger
I just started my micro bootlegger and am a first time boat-builder. The hardest part was just getting the never to attach that first sheer strip, but I do have some questions if anyone can help.
- How important are the form spacers on the hard back? Can I get by without them?
- The boat is just longer than two of my WRC strips, which means a lot of scarfing. I'm gettng a little impatient with creating long strips, and I wonder if I can get by with just attaching my cove and bead strips end-to-end without joining them with the scarfing technique.
- Any suggestion on whether to start with the hull or the deck?
Thanks for any words of wisdom that might be out there!
Dan
RE: micro bootlegger
Hello Dan and welcome to the world of strip building! I have not built the Bootlegger but have done six other strip builds. I will note that the Bootlegger is a beautiful boat but not the easiest strip build. Even so, it is within the capabilities of a first-time builder who is willing to be methodical and ask questions when there are doubts. General suggestions follow:
1. If you have not already, buy and read Nick’s book, “The Strip Built Sea Kayak.” This is basically your build manual.
2. If you have not already, go to Nick’s YouTube channel and watch a bunch of his videos. I believe that he even has a series on building a Bootlegger. You will pick up numerous good techniques by watching him work. Before you do any glassing, I would also recommend watching the CLC videos on that subject available under the “Tips for Boatbuilders tab.”
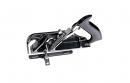
3. Buy a good hand plane and learn how to sharpen it. Unless you buy an expensive plane (like Lie Nielsen), the blade will dull out of the box. With a sharp plane you get much better cuts and your seams will be tighter with much less work. Look at the Honing Guide from Veritas.
4. Do not try to go staple-less with your first build.
5. Strip building is a game of patience. Don’t set a schedule for your build. If you have a strip that is not fitting, walk away and come back later.
Regarding your specific questions:
1. It is very important that the forms are properly positioned and rigidly secured on the hard back. Nick’s approach of using spacers is a good one if you are going to build multiple boats with the same form spacing. Otherwise, you can secure the forms with wood blocks and screws. Personally, I screw wood blocks to the hard back then use hot glue to secure the forms. This allows me to loosen the forms with a hammer when it is time to release the boat from the forms.
2. It is VERY important that the first strip is properly aligned and runs smoothly along the length of the boat. For this reason, you should scarf the first strip before stapling it to the forms. Once that strip is in place, you can butt join subsequent strips on the boat as you strip. If you are careful matching the color/grain pattern of the strips, the joint will be all but invisible.
3. Technically you can start either first, but I think most builder start with the hull. The hull is a little easier to strip and it allows you to develop your technique prior to starting the more difficult deck.
LMK if you have any other questions and good luck.
Yukon under construction. Not the blocks used to position the forms. When it is time to free the boat from the forms, I gently tap the forms with a hamer, moving them toward the center of the boat.

To the left of each piece of tape is a butt joint between two strips. You can see that the joints are barely visible if you match color/grain of the two strips. I do the butt joints at a 45 degree angle so that a single clamp will grab both strips.
Strip builds 1, 3, 4 & 6.
RE: micro bootlegger
Hi Mark,
You, sir, are fantastic! Thanks so much for taking the time to thoughtfully respond to my questions and to attach photos. It's a huge relief to see how you are doing the 45 degree angle butt joins. I only have two strips on so far, and the first sheer strip is a little wonky, so I am planning to start over. No huge loss. I also have some wiggly forms that need to be tightened, and your technique looks easier that what Schade did with builing a couple dozen wood blocks.
I was trying Nick Schade's hot glue technique despite some other warnings, but I think you have convinced me to go with staples for my first build. The perfectionist in me hates to leave visible staple holes in the final product, but maybe I'll get one boat under my belt before jumping into that.
My biggestest challenge is actually my lack of space. I'm set-up in a pretty narrow room without much space to spread out. I may have to eventually move this operation to the back yard.
Finally, you're boats are gorgeous! Congratulations. I hope to get there some day and start building additional boats for other family members.
Happy boating,
Dan
RE: micro bootlegger
Glad to help, Dan!
Regarding staples, your build will be much easier if you use them and the holes are not really that noticable. If you look at my picture above, I used staples on the 2nd boat from left (first strip build) and it came out very well. When you look close, you can see the staple holes but not really otherwise. When I started my 3rd strip build (3rd from left) I tried to go staple-less but kept having strips pull away from the forms no matter how much hot glue I used. I unded up doing what I would call "semi-staple-less" on that and all subsequant builds. I basically stapled the Alaskan White strips only because that wood is more dense and harder to twist/bend. One last tip regarding staples: when the boat is completely sanded and almost ready for glass, take a very wet rag and wipe down the entire boat. The water will raise the grain of the wood and also swell the wood a little making the staple holes less visable. After it dries, do a light sanding with 220 then glass.
One other tip that will help you work in tight spaces is to install locking castors on the boattom of your work stands. This will allow you to easily move the boat around for better access where you are working.

RE: micro bootlegger
I can't possibly add anything to what Mark says about technique, but as far as staple holes (and stitch holes for S&G), I've found the concept of honesty in materials, or more formally, Truth to Materials very useful. It comes from architectural theory and shows up in sculpture as well. It was a major tenet of the Bauhaus 100 years ago. Some prominent members of that group were Gropius, Klee, Moholy-Nagy and the Albers, all highly respected and legitimate artists and designers. They were described as "individuals [who] combined the know-how of traditional craftspeople with contemporary machine processes to create modernist pieces across all of the art forms." That last sentence seems like a perfect description of a CLC homebuilder.
The actual theory principle is simple - any material should be used where it is most appropriate and its nature should not be hidden. In buildings this means things like bare concrete and exposed wood or steel beams, etc. For our boats it's visible wood grain and stitch or staple holes.
It's actually been a boat-building tradition for over a thousand years before being formailzed by modern artists. Coracles have visible frames inside their pitch-covered skins. Viking ships have visible rivets through their pitch-soaked planks. Iron hulls have visible rivet heads. Rigging has visible fibers. Sails are obviously textiles. The list goes on.
So whether you consider your boats creations of the modern art style as exemplified by the Bauhaus or the latest in a long line of watercraft, visible artifacts of the construction method are not a bad thing. In fact, by certain theories they actually make your boat better.
Laszlo
RE: micro bootlegger
Question about MICROBOOTLEGGER TANDEM hull design.
I am just finishing the hull of my first build. This is exciting. I'm dredding the external stem, which looks like a difficult process. I'm also a little unsure about the fiberglassing and epoxy work, since I've never worked with this stuff before, but the best part of this first build is gaining confidence with new tools and skills. I've warned my wife that this is my "starter" boat, and there will be more in the furture.
I have a question about the shape of the hull for the microbootlegger tandem. In some videos and images I've seen from Nick Schade, it appears that the bottom of the hull is rather flat like a canoe. In others, it appears that there is a pronounced keel line from bow to stern. As I start sanding and shaping the hull, should I try to keep a pointy keel? Will this significantly affect performance in the water?
Thanks for any thoughts and encouragement.


RE: micro bootlegger
» Submitted by beerguy2 - Sat, 12/18/10 » 1:21 AM
I just received my bootlegger and wondered if there is anything I should know about based on your experience.