POPULAR MECHANICS – OCTOBER 2003


BOAT IN A KIT; STITCH IT, GLUE IT AND ROW IT AWAY by Joe Provey
Back in the days when small boats were powered by oar and sail, they had to move easily through the water. And it's no surprise that they looked good, too. The water-kindly lines that enabled a hull to slip effortlessly through a calm or handle a freshening breeze produced some of the most graceful and elegant shapes to come out of a wood shop.
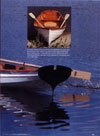
Of course, those boats took real skill to build, and a decent supply of high-grade lumber to boot--two reasons why today's weekend woodworker might feel a bit safer sticking with a simple slab-sided plywood skiff. According to kit boat manufacturer Chesapeake Light Craft (CLC), though, new materials and building techniques have changed all that. To see for ourselves, we built the company's newest kit, the Chester Yawl. It has a 15-ft. hull with a 44-in. beam, wineglass transom, mahogany detailing and the look of a century-old wooden craft. The kit comes with everything you need except paint and oars, and costs about $1000 (Chesapeake Light Craft, 1805 George Ave., Annapolis, MD 21401; www.clcboats.com).
CLC utilizes a building method that creates the look of lapstrake construction (overlapping planks) without the building jigs, molds, frames or steam bending used in conventional boatbuilding. Using what is called LapStitch™ technology, rabbets cut with CNC (computer numerical control) tooling allow the precut planks to nest and self-align as they're joined. What's more, instead of the riveting or clench nailing used in a traditional lapstrake hull, the parts are literally stitched together with copper wire and then welded into a unitized whole with epoxy.
The boat is built of 6mm marine-grade okoume plywood, making it much lighter than commercially manufactured fiberglass or plastic boats. Two people of average build can easily lift the Chester Yawl's 110 pounds onto a car rack or trailer.
Like its ancestors, small rowing and sailing boats of the 19th century, the Chester Yawl is versatile and practical. It can be rowed solo or with two oarsmen, and can hold three adults. Fore and aft flotation tanks keep it from sinking if capsized, and the forward tank has a screw-off circular hatch so you can stow cameras and other gear in a dry place. Finally, the Chester Yawl can be fitted with one or two sails--or a light motor.
Preparing The Planks
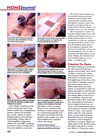
The hull is made up of six planks per side, and each pair has a unique curved shape. Each plank, or strake, comes in two pieces that you glue together at precut scarf joints. To join the pieces, first apply tape at the sides of the scarf joints to mask the surfaces from excess epoxy (Photo 1). When assembling the plank halves, it's important to align the pieces accurately so that the hull will assume the correct, symmetrical shape. Mark a base line on your worktable, align the bow and stern ends so they touch this line, and position the pieces so the arc height of the curve conforms to the measurement given in the plans for that pair of planks (Photo 2).
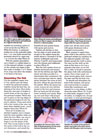
Then, with a plastic sheet under the work, spread epoxy on the mating surfaces. Assemble the joint, and staple the pieces to the worktable to hold them in position. Mask and apply epoxy to the identical opposite strake, and stack it on the first (Photo 3). Clamp the joints together by screwing a piece of wood across the top (Photo 4). While the bottom, or garboard, strakes are on the assembly table, bore 1/16-in. wire holes around the perimeter about 6 in. apart and 1/2 in. in from the edge (Photo 5).
With the planks assembled, use a chisel or a rabbet plane to cut the tapered rabbets, or gains, on the outside top edges of the bow ends of strakes 1 to 5. These 10-in.-long cuts allow the strakes to lie flush at the bow.
Assembling The Hull
Cut the supplied copper wire to 3-in. pieces and use these to stitch the garboard strakes together along the keel line, beginning at the stern. Bore holes along the next pair of strakes to match those on the top edge of the garboard strakes. Stitch this pair in place so the top edges of the garboard strakes fit into the precut rabbets. Close each stitch with a few twists of the wire, but leave them slightly loose--you'll tighten them later (Photo 6). .
Once all 12 strakes are stitched together, have a helper hold the ends together while you stitch the bow. Next, use wire to attach the transom and you'll begin to see the shape of the hull. Use a scrap board to hold the center of the hull at the correct dimension, and install the breasthook and quarter knees with epoxy and screws.
Tighten all stitches so that the top edge of each strake fits snugly in the rabbet along the strake above it. Proceed to fit the frames, bulkheads and seats (Photos 7 and 8), and temporarily wire the frames and bulkheads in place (Photo 9).
Rest the hull upside down on leveled sawhorses and ensure that all the stitches are tight. Mix epoxy and silica powder to a mayonnaise-like consistency. Using a syringe-type injector, apply epoxy between the wires at each lap joint, filling the gap between the planks. When the epoxy has cured, remove all wire stitches except at the bow and transom. Now go back and fill all strake joints carefully and neatly. Wipe up runs and drips with lacquer thinner if necessary. While the joints cure, fill the stitch holes with epoxy thickened with a supplied wood powder.
Next, prepare to apply fiberglass cloth to the exterior of the garboard strakes by masking off the adjacent planks with tape. Gently spread the cloth in place. You may run the cloth up the stem at this time or do it as a separate step later, as we did. Use a roller or brush to saturate the glass cloth with unthickened epoxy. Once it has cured, cut away excess glass cloth, remove the tape and flip the boat over.
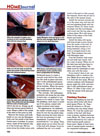
To smooth and strengthen the joint at the transom, mix epoxy and wood powder to a peanut butter-like consistency, and spread it in a cove shape, or fillet, along the seam (Photo 10). A plastic putty knife, snipped to the fillet radius, is a helpful tool, though your latex- or vinyl-gloved fingers will do the job too. Scrape up all drips and excess epoxy before it cures. Shape a fillet at the inside of the stem at this point as well.
Remove the frames and bulkheads so you can lay fiberglass cloth over the inside of the three lowest pairs of strakes. In preparation, mask off the bottom edges of the fourth pair. Fill low areas along the strake joints with thickened epoxy to create a smooth, even bed for the cloth. Lay the cloth in place and saturate it with unthickened epoxy (Photo 11). Be sure to eliminate all air bubbles. When the epoxy has cured, restitch the frames and bulkheads in place.
The outwale--the mahogany perimeter rail along the top edge of each side--is applied in two layers so it's easier to bend. Like the planking, each layer is made up of two pieces, joined with epoxy at precut scarf joints.
For appearance, we rabbeted the inside outwale strips to make them fit over the top plank edge. Begin securing the inner strip at the bow by screwing it to the breasthook. Counterbore all screw-holes for 3/8-in. plugs. Then, apply epoxy as you draw the rail to the hull with clamps. If you've rabbeted the rail, cut a small notch at the end so it fits around the transom. Screw the aft end of the rails to the quarter knees.
Install the second outwale layer in the same way, and trim the rail and planking flush with the transom (Photo 12). Drive wooden plugs over the screwheads, and round over the top edge with a sharp plane. Now add epoxy fillets at the edges of the bulkheads and frames.
Install the skeg with epoxy and long bronze screws driven from the inside of the hull. To keep the skeg straight as it's being fastened, clamp a 4-ft. level or straight board to the side. Then reinforce the joint with fiberglass tape.
Coat the flotation tank interiors and tank tops (seats) with two coats of epoxy. When dry, fit the tank tops and glue them in place with epoxy fillets. The tanks must be watertight so take extra care with the joints.
If you haven't done it yet, use fiberglass cloth to reinforce the bow. Mask off an area about 5 or 6 in. from the bow seam. Fill any uneven surfaces with thickened epoxy, apply the cloth, and saturate it with unthickened epoxy (Photo 13). After it has cured, cut away the excess cloth and peel off the tape.
Finishing Touches
Prepare for finishing by first filling any stitch holes with thickened epoxy (Photo 14). Then, sand all surfaces to 100 grit, rounding over any sharp edges (Photo 15). Coat the inside and outside of the hull with three coats of epoxy, sanding between coats (Photo 16). Then, prime the outside followed by two coats of white marine-grade polyurethane paint. Apply at least three coats of marine-grade varnish to the unpainted mahogany.

 return to section:


