Boatbuilding Tips
Our vast collection of boatbuilding tips, drawn from decades of experience in supporting backyard boatbuilders.


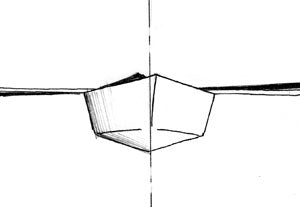
Checking for Twist
Occasionally twist can develop in any boat built without forms and a strongback. Here's a technique, called winding, allows you to quickly check that your kayak is straight. Before taping...
Checking for Twist
Occasionally twist can develop in any boat built without forms and a strongback. Here's a technique, called winding, allows you to quickly check that your kayak is straight. Before taping...
Cheap Clamps
How many clamps does it take to build a kayak? With only 15 it's tough; 25 is better. We've often used 40 or 50. So even if you buy only...
Cheap Clamps
How many clamps does it take to build a kayak? With only 15 it's tough; 25 is better. We've often used 40 or 50. So even if you buy only...

Cabinet Scrapers for Boatbuilding
Boatbuilders seeking to ease the tedium of sanding have latched onto a very old-fashioned tool to deal with a high-tech problem: cabinet scrapers to smooth cured epoxy. Cabinet scrapers are...
Cabinet Scrapers for Boatbuilding
Boatbuilders seeking to ease the tedium of sanding have latched onto a very old-fashioned tool to deal with a high-tech problem: cabinet scrapers to smooth cured epoxy. Cabinet scrapers are...
Boatbuilding Terms Defined
There's a wonderful sequence in E.B. White's Stuart Little where Stuart and a sailor friend mock another boat's owner, saying he doesn't know "...A jib from a jibe...or a luff...
Boatbuilding Terms Defined
There's a wonderful sequence in E.B. White's Stuart Little where Stuart and a sailor friend mock another boat's owner, saying he doesn't know "...A jib from a jibe...or a luff...
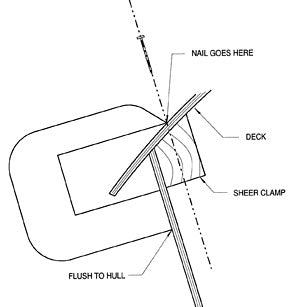
Aligning Deck Fasteners
When fastening down a deck with bronze ring nails or screws, it's hard to get them all to line up evenly - especially if the deck panels are cut oversize...
Aligning Deck Fasteners
When fastening down a deck with bronze ring nails or screws, it's hard to get them all to line up evenly - especially if the deck panels are cut oversize...
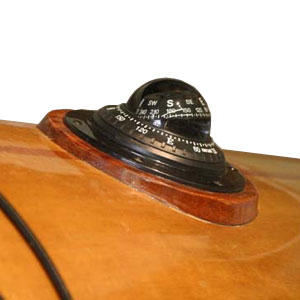
Wooden Compass Mount
Here's an elegant wooden compass mount you can make. 1: Begin with about a 6" x 6" block of wood; trace deck camber onto the side of the block. 2:...
Wooden Compass Mount
Here's an elegant wooden compass mount you can make. 1: Begin with about a 6" x 6" block of wood; trace deck camber onto the side of the block. 2:...
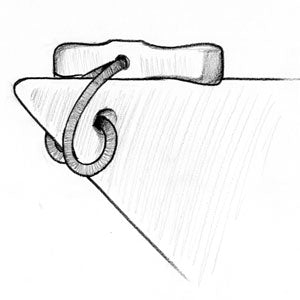
Toggles for Kayaks
The plans for many of our touring kayaks show a loop of line at bow and stern for carrying handles. This is the simplest approach and brutally strong, but hard...
Toggles for Kayaks
The plans for many of our touring kayaks show a loop of line at bow and stern for carrying handles. This is the simplest approach and brutally strong, but hard...
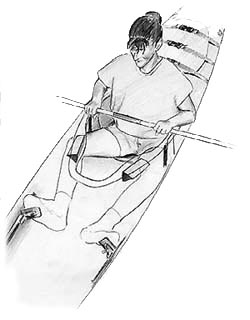
The Perfect Cockpit
One does not sit in a kayak; one wears a kayak - It's difficult to brace, make sweep turns, and/or to roll a kayak if your hips, knees, feet, and...
The Perfect Cockpit
One does not sit in a kayak; one wears a kayak - It's difficult to brace, make sweep turns, and/or to roll a kayak if your hips, knees, feet, and...
Rudder, Retractable Skeg or Nothing?
"Tracking" is the ability of a boat to travel in a straight line. All other things being equal, a kayak with a long straight keel tracks better than a short...
Rudder, Retractable Skeg or Nothing?
"Tracking" is the ability of a boat to travel in a straight line. All other things being equal, a kayak with a long straight keel tracks better than a short...
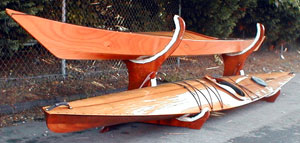
Kayak Rack Storage
Someone recently observed that if all of the CLC boats that have been built were placed end to end, they would stretch for more than 45 miles. That’s a lot...
Kayak Rack Storage
Someone recently observed that if all of the CLC boats that have been built were placed end to end, they would stretch for more than 45 miles. That’s a lot...
Kayak Deck Rigging
CLC offers a wide selection of Deck Rigging Fittings and Rope & Cordage.
Kayak Deck Rigging
CLC offers a wide selection of Deck Rigging Fittings and Rope & Cordage.
Internal Footbrace Mounts
We have long been advocates of KISS-principle footbrace installation: just through-bolt the footbraces to the sides of the kayak hull. However, we've heard from scores of builders over the years...
Internal Footbrace Mounts
We have long been advocates of KISS-principle footbrace installation: just through-bolt the footbraces to the sides of the kayak hull. However, we've heard from scores of builders over the years...

Installing Knee Braces
A kayak should not be so tightly padded that it is uncomfortable, but when you flex your ankles and push up with your knees a bit, you should be solidly...
Installing Knee Braces
A kayak should not be so tightly padded that it is uncomfortable, but when you flex your ankles and push up with your knees a bit, you should be solidly...
Installing Flush Hatches without Toggles
If you'd like to opt for an even cleaner deck than a standard flush hatch system, you can try our internal bungie-hatch system. Using some simple wooden blocks, bungie cord...
Installing Flush Hatches without Toggles
If you'd like to opt for an even cleaner deck than a standard flush hatch system, you can try our internal bungie-hatch system. Using some simple wooden blocks, bungie cord...

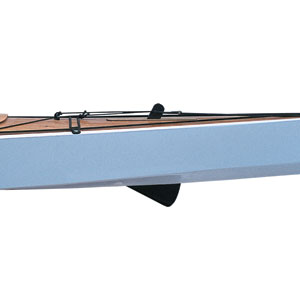
Installing a Retractable Skeg
If you paddle open water, you'll occasionally come upon conditions of wind and sea in which even the best-tracking kayak will broach or weathercock. A rudder is the common solution...
Installing a Retractable Skeg
If you paddle open water, you'll occasionally come upon conditions of wind and sea in which even the best-tracking kayak will broach or weathercock. A rudder is the common solution...
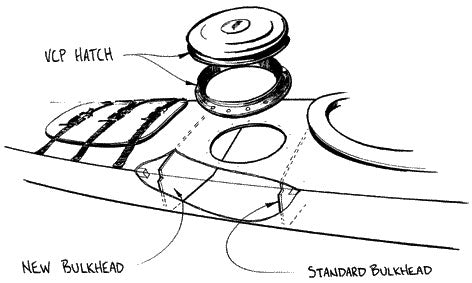
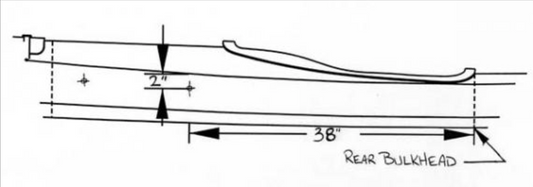
Installing a Day Hatch
Day hatch compartments are seen on many serious touring kayaks. A day hatch gives the paddler a secure storage area that is accessible while on the water. The hatch opening...
Installing a Day Hatch
Day hatch compartments are seen on many serious touring kayaks. A day hatch gives the paddler a secure storage area that is accessible while on the water. The hatch opening...
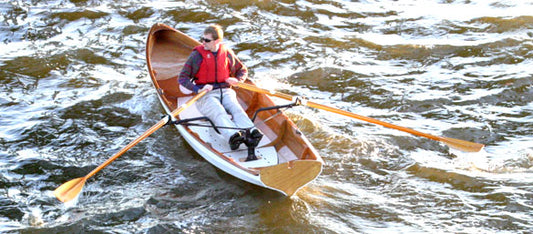
How to Install a Drop-In Rowing Unit in a Chest...
We are often asked if a sliding seat unit can be installed in the Chester Yawl. The answer is "Yes!" and here's how to do it in a few simple...
How to Install a Drop-In Rowing Unit in a Chest...
We are often asked if a sliding seat unit can be installed in the Chester Yawl. The answer is "Yes!" and here's how to do it in a few simple...
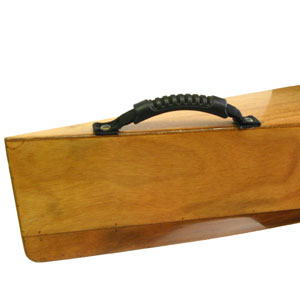
Handles
Handles may not be nautical, exactly, but if you cartop your boat they’re essential. Here at CLC we’ve tried many schemes over the years and here are three that work...
Handles
Handles may not be nautical, exactly, but if you cartop your boat they’re essential. Here at CLC we’ve tried many schemes over the years and here are three that work...
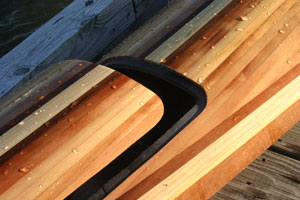
Flush Mounted Deck Hatches
As long as there have been CLC boat kits, there have been builders who designed and installed flush-mounted deck hatches. The stock hatches are easy to build and use; builders...
Flush Mounted Deck Hatches
As long as there have been CLC boat kits, there have been builders who designed and installed flush-mounted deck hatches. The stock hatches are easy to build and use; builders...
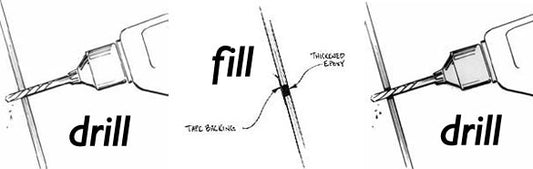
Drill, Fill, Drill
We cherish the look of wood. Epoxy and fiberglass cloth sheathing is part of the miracle that lets us enjoy the beauty of wood without laborious annual maintenance. But what...
Drill, Fill, Drill
We cherish the look of wood. Epoxy and fiberglass cloth sheathing is part of the miracle that lets us enjoy the beauty of wood without laborious annual maintenance. But what...
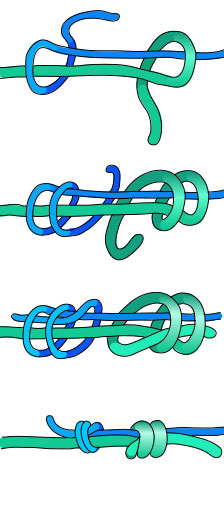
Double Fisherman's Knot (for grab handles)
Lots of folks have called to ask how to tie the knot we use on the Chesapeakes' grab handles. We hope this helps.
Double Fisherman's Knot (for grab handles)
Lots of folks have called to ask how to tie the knot we use on the Chesapeakes' grab handles. We hope this helps.

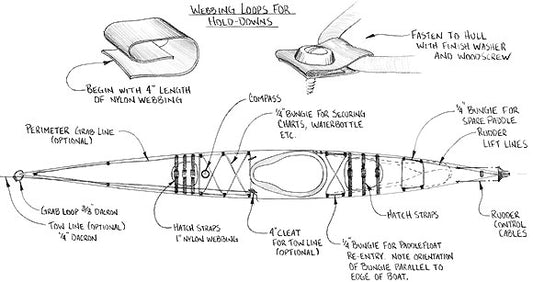
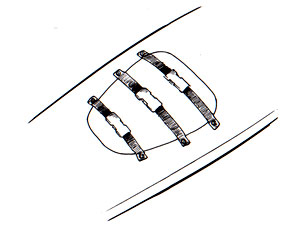
Deck Hold-Down Fittings
Most kayak manufacturers use little plastic eyes to secure deck lines and hold-down bungee cord. The problem with these is that they become painful bumps when you practice wet re-entries,...
Deck Hold-Down Fittings
Most kayak manufacturers use little plastic eyes to secure deck lines and hold-down bungee cord. The problem with these is that they become painful bumps when you practice wet re-entries,...
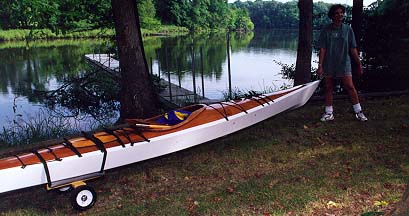
CLC Kayak Cart
Anyone who has moved a loaded kayak more than a few feet will appreciate this kayak cart. Not only is it easy to build, but it also fits folded in...
CLC Kayak Cart
Anyone who has moved a loaded kayak more than a few feet will appreciate this kayak cart. Not only is it easy to build, but it also fits folded in...
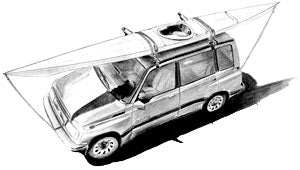
Cartopping
Losing a boat off your car is a nightmare scenario. Here are some tips on how to keep boat and car from flying down the highway in close formation. Roof...
Cartopping
Losing a boat off your car is a nightmare scenario. Here are some tips on how to keep boat and car from flying down the highway in close formation. Roof...